
Air Quality Monitor
![]()
![]()

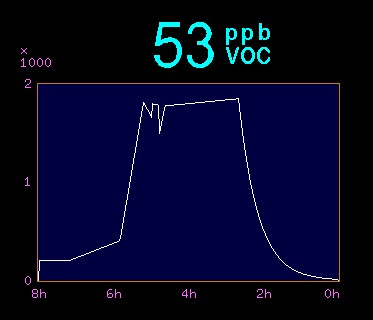
This Air Quality Monitor displays the level of VOCs (Volatile Organic Compounds) in the air as a number and a graph over time. VOCs are one of the primary measures of indoor air quality and are associated with the "sick building syndrome".
It uses a cheap sensor module (approx US$15) and can be build in less than an hour. It is controlled via the LCD touch screen which allows you to configure the graph, zero the reading and upgrade the the sensor..
This project is based on the low cost Micromite LCD Backpack (described elsewhere on this web site) and provides a great way to monitor the air in your home.
The Air Quality Monitor was described in the February 2020 issue of Silicon Chip magazine. This web page provides a short description so, if you want the full story, you are encouraged to read the magazine article. Back issues of the article can be purchased from Silicon Chip or electronic access can be purchased for about the cost of the printed issue.
Micromite LCD Backpack
This project is based on the Micromite LCD Backpack which a combination of a low cost colour LCD display and a 32-bit microcontroller programmable in BASIC. In part this project was created to provide an example of what the Micromite is capable of so please feel free to download the BASIC program and extract portions of it for your own projects.
What are VOCs?
VOCs (Volatile Organic Compounds) are organic carbon molecules that are in vapour form suspended in the air and refers to any one of the thousands of organic (carbon containing) chemicals that are mostly a gas at room temperature. These can be man made or naturally occurring chemicals. The amount, or concentration, of VOCs measured by this project is expressed in parts per billion (ppb).
There are many sources of VOCs including plants, manufactured products and animals (including humans). A subset of VOCs are semi-volatile organic compounds which come from building materials, furnishings, cleaning compounds, air fresheners, pesticides and activities such as tobacco smoking and cooking with a gas stove.
For more information refer to Wikipedia on VOCs.
The CCS811 Sensor
The CCS811 sensor used in the Air Quality Monitor measures total volatile organic compound concentrations. This term refers to the concentration of many different VOCs that are present simultaneously in the air and the CCS811 is more sensitive to the subset of VOCs that are normally caused by human activity and indicates the quality of the air that we breathe. For example, a reading of zero indicates clean, fresh air. A reading of 4,000 ppb to 8,000 ppb would be a stuffy room while a reading of over 16,000 ppb would indicate a particularly bad environment.
The CCS811 is manufactured by AMS and comes in a tiny surface mount package that is impossible to hand solder. Fortunately you can purchase a fully assembled module which includes a CCS811 and a HDC1080 temperature and humidity module. The CCS811 sensor needs to know the temperature and humidity so that it can compensate for their effect on the VOC reading. So having both together makes sense.
The CCS811 is a MOX sensor which means that it uses a thin film of metal oxide to sense the presence of reducing molecules in the air ("reducing" means to grab oxygen). When the sensor is sitting in clean air oxygen will settle on the metal oxide surface and will attract electrons in the film causing an increase in its resistance, Then, when VOCs are in the air they will "steal" these oxygen atoms, freeing electrons in the metal oxide film causing a reduction in its resistance. A heater just under the film facilitates this reaction.
By adjusting the composition of the metal oxide film and the heater temperature the manufacturer can tune the sensor to be sensitive to different ranges of VOCs which, in the case of the CCS811, are VOCs that are normally found indoors and caused by human or animal activity.
A more detailed description of MOX sensors can be found in these references:
- AMS Webpage for the CCS811
- Operating Principals of MOX Sensors
- uRADMonitor Description of MOX Sensors
Using the Air Quality Monitor
On power up the CCS811 needs a 20 minute warm-up period and during this period the BASIC program will display a countdown screen showing the wait time. You can skip this if you wish but it is worth letting the sensor stabilise otherwise the readings could be nonsense.
After the warm up time the device will display the current VOC reading and a graph of the reading over time (as shown on the right).
To configure this graph you need to briefly touch anywhere on the LCD screen. When you do this the display will switch to the settings screen as shown below.
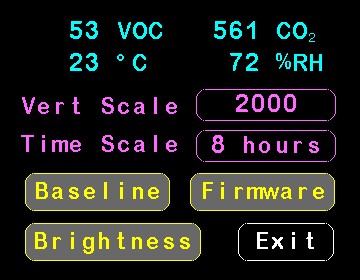 Using "Vert Scale" and "Time Scale" buttons you can set a full scale of 500 ppb to 64,000 ppb and the horizontal time scale from 15 minutes to 32 hours full scale. This is done by repeatedly touching the buttons and the setting will step through a range of values.
Displayed on the top of this screen are the raw readings from the CCS811 and HDC1080 sensors. The VOC reading is a repeat of the reading on the main screen while the CO2 reading is something calculated by the CCS811 sensor. It assumes that the VOCs that it is detecting comes from human respiration and it infers the CO2 reading from that. This is not very accurate because there are many other things that can contribute to the VOC reading (new furnishings, gas cookers, etc) but as the sensor produces this number we display it anyway.
Below this are the temperature and humidity readings from the HDC1080 sensor. On the prototype I found that the temperature was reading high by a few degrees on two different modules- perhaps caused by the close proximity of the HDC1080 sensor to the CCS811 sensor (which includes a small heater). Regardless, it was sufficiently accurate for the CCS811 sensor which uses these readings to compensate for environmental factors.
At the bottom of the setup screen there are three buttons which will take you to other screens for setting the baseline, upgrading the CSS811 firmware and adjusting the brightness of the LCD screen.
Setting the Baseline
 The MOX sensor used in the CCS811 can be contaminated over time causing the zero reading (or baseline as AMS calls it) to drift. To compensate for this it is recommended that the baseline be set once a week for the first couple of months of use and from then on it will only need to be set once a month.
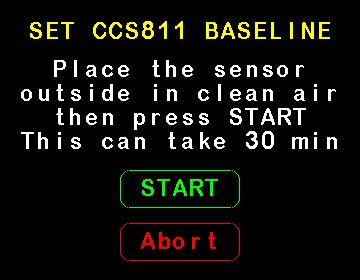
To set the baseline place the device outside in clean air and touch the "Baseline" button on the setup screen. The BASIC program will step through this process which involves waiting for the sensor to stabilise from the power on condition (20 minutes) then allowing the sensor to determine the baseline over a 10 minutes period. This baseline is saved in non volatile memory by the BASIC program and copied to the CCS811 every time the power is turned on.
When this process has finished the device will return to the main screen showing the reading and graph.
Upgrading the CCS811 Firmware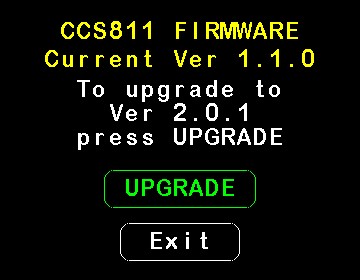
The CCS811 includes its own microcontroller which is used to measure the resistance of the MOX sensor and carry out other functions. The latest firmware available for the CCS811 is V2.0.1 however many modules are still using sensors running V1.1.0 or even earlier. The latest firmware has improved algorithms and the range of readings extends to 64000 ppb VOC (the old firmware had a limit of 1187 ppb VOC).
The CCS811 firmware can be updated by the BASIC program by touching the "Firmware" button on the setup screen. Then touching the "Update" button will update the firmware in less than 30 seconds. You do not need special files or anything else as everything is done by the BASIC program running on the Micromite.
Setting the Brightness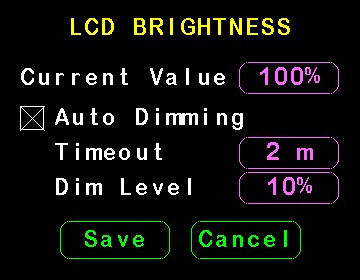
If your Micromite LCD Backpack includes the ability to control the brightness of the screen by the BASIC program you can configure this by selecting the "Brightness" button on the setup screen.
This will take you to the screen shown on the right and by repeatedly pressing the "Brightness" button you can step through a range of brightness levels from 10% to 100%.
By ticking the "Auto Dimming" checkbox you can set a timeout and the level of brightness when the timeout has expired. This is useful for reducing the power demand if you are running the Air Quality Monitor from a battery. It operates when the main screen (with graph) is displayed and a touch anywhere will restore full brightness.
Circuit Diagram
The Air Quality Monitor is just the Micromite LCD Backpack with the CCS811 module. For details of the Micromite LCD Backpack see this web page and for the 28-pin Micromite see this web page.

The power supply for the above circuit comes from a standard 5V USB charger with at least 400mA capacity. To make a cable for this you need to cut one end off a standard USB cable (retaining the end with the type A connector) and connect the red wire to the 5V pin on CON1 and the black to ground. The other two wires in the cable can be cut short. Alternatively you can use a DC power socket as shown above and power the monitor from a regulated 5V power pack (make sure that it is regulated).
Both the CCS811 and HDC1080 use I2C as their communication protocol so the sensor module is connected via its SCL and SDA pins to the I2C communication pins on the Micromite LCD Backpack. The module is powered by 3.3V so its VCC pin goes to the 3.3V output on the backpack and the GND pin is the common ground. The other pins on the sensor module (WAKE, ADDR, etc) are not used so they can be left unconnected.
Sensor Module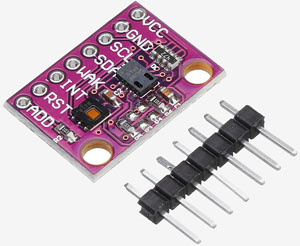
The sensor module can be found on eBay or AliExpress by searching for the two keywords CCS811 and HDC1080. Prices range from US$10 to US$20 with many vendors offering free shipping.
There are a lot of modules on offer that will match either of the keywords so you need to make sure that your module includes both sensors and preferably matches the photograph shown on right. This last part is important as there are a number of sensor modules circulating that claim to incorporate both sensors but the images displayed by the vendor show that the module does not include the HDC1080 temperature and humidity sensor which is critical to the correct operation of the device.
Loading the Firmware
The first step is to build and test the Micromite LCD Backpack as described on its web page. Then there are three steps in the process of loading the air quality monitoring program:
- Load the Micromite firmware using a PIC32 programmer (see this page).
- Configure the Micromite for the LCD display (see the Micromite LCD Backpack Construction Pack).
- Load the file AirQuality.bas (see the download area below) onto the Micromite. For more information on how to do this see the Micromite User Manual.
You can reduce this to one step by simply programming a blank PIC32 with the file AirQuality.hex (available at the bottom of this page). This combines all three steps into the one file which includes the Micromite firmware, the settings for the display panel and the BASIC program for the Air Quality Monitor .
If you do not have a PIC32 programmer you can purchase a 28-pin PIC32 microcontroller from Silicon Chip magazine pre programmed with the full firmware (ie, AirQuality.hex) by following this link. This makes it very easy, all that you need do is just plug the chip into its socket on the PCB.
Silicon Chip also offer a full kit of parts for the Air Quality Monitor including the Micromite LCD Backpack, their front panel, CCS811 module, the PCB, etc. Follow the above link if you are interested.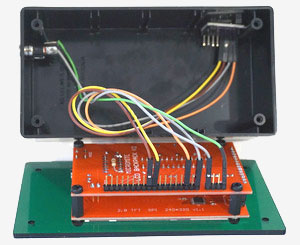
Construction
When it comes to putting the Air Quality Monitor into a box you can do pretty much what you want. I built mine in a standard sized UB3 plastic box. Suitable suppliers for this are Altronics (Cat H0203) and Jaycar (Cat HB6013).
I replaced the lid with a plastic sheet sold by Silicon Chip which was laser cut by them to suit the 2.8" version of the Micromite LCD Backpack. If you do not want to go to this expense you can fabricate your own by cutting the required holes in the standard lid supplied with the box.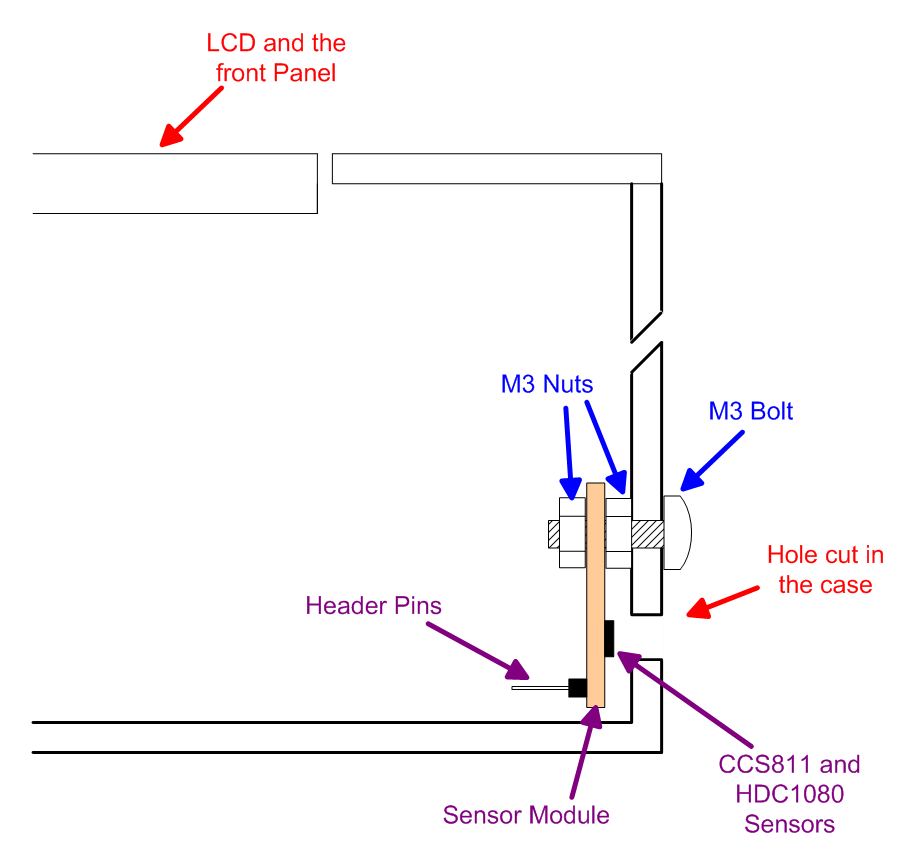
The CCS811 module should be mounted on the side of the box with both sensors (the CCS811 and HDC1080) positioned so that they are facing two large holes in the case allowing them to sample the free air. The diagram below shows what is required.
Also make sure that the module does not interfere with the pin headers on the Micromite LCD Backpack.
To connect the sensor module to the backpack it is worth using wires with "DuPont" connectors so that you can easily remove the module for testing or if you need to replace it.
Setting Up
Following assembly you may need to upgrade the firmware in the CCS811. This procedute is explained above and involves going to the firmware screen, checking the version of the current firmware and, if needed, upgrading to the latest.
You will then need to let the CCS811 go through a burn-in period before trying to do anything with it - this involves just leaving the Air Quality monitor powered up continuously for 48 hours. This is different from the standard 20 minute warm up period that you must observe when turning the monitor on. The burn-in period is important as the MOX sensor will have some surface containments and they need to be burnt off before you can get a reasonable reading (the CCS811 has a built in heater).
After the burn-in period you should then set the baseline as described above. This involves putting the gadget in the open fresh air and touching the "Baseline" button on the setup screen. This operation will take 10 to 30 minutes and the display will revert to showing the VOC reading and graph when the baseline has been set. For the first couple of months this should be done weekly and after that monthly.
Battery Operation
If you want to power the device from a battery the best approach is to use a "power bank" for mobile phones . These have everything that you need in a portable 5V power source and they are quite cheap – certainly cheaper than trying to build the same capability using off the shelf components.
The main power consumption when using the Air Quality Monitor comes from driving the LCD backlight - that alone can be up to 250mA at full brightness. This is one of the reasons why the auto dimming feature is included. As an example, using auto dimming you could reduce the brightness to 10% after a minute or two and that would reduce the current drawn by the backlight to about 25mA.
The Micromite itself draws about 26mA and the CCS811 and HDC1080 sensors combined about the same so, with the displayed dimmed to 10%, the total current should be about 80mA. A power bank with a genuine 5000mA/h rating should then last for at least 24 hours.
| Air Quality BASIC Program (AirQuality.bas) | DOWNLOAD |
| AirQuality.hex This is a combined firmware file that contains the Micromite firmware configured for the LCD panel and the BASIC Air Quality program. It must be loaded into the Micromite using a PIC programmer or Microbridge |
DOWNLOAD |