
Parking Assistant
![]()
![]()
![]() The Parking Assistant makes it easy to park your car in a tight garage.
The Parking Assistant makes it easy to park your car in a tight garage.
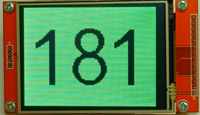
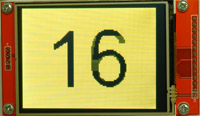
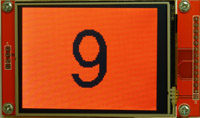
It mounts on the back wall and as you drive your car into the garage it will display the distance to the wall in centimetres on a large colour coded 2.8" display .
The colour coding uses green to tell you to continue, yellow to slow down and red to stop. All the time the exact distance is shown in centimetres, so you will always know exactly how close you are to bumping into the wall.
It is based on the popular Micromite LCD Backpack and uses a dozen components costing about $25.
A ball hanging from the ceiling is cheaper but this is more fun!
The Parking Assistant was described in the March 2016 issue of Silicon Chip magazine. This web page provides a short description so, if you want the full story, you are encouraged to read the magazine article Back issues of the article can be purchased from Silicon Chip or electronic access can be purchased for about the cost of the printed issue.
Micromite LCD Backpack
The Parking Assistant is based on the Micromite LCD Backpack which uses a low cost colour LCD display mated to an even lower cost 32-bit microcontroller which is programmed in BASIC. The only extra item is an ultrasonic distance measuring sensor which costs about US$3 on eBay. The Micromite LCD Backpack is perfect for this project as it is low cost and easy to build. Since its launch it has proved very popular and over a thousand have been built.
The vital ingredient in this project is the BASIC program which drives the ultrasonic distance sensor and displays the result on the LCD display. This program is free for you to use and modify and can be downloaded from the bottom of this page.
In part this project was created to provide an example of what the Micromite is capable of and you are encouraged to explore the BASIC program and extract portions of it for your own projects... even if you do not want to built this particular project.
Using the Parking Assistant
Normally the display of the Parking Assistant is blank but as your vehicle approaches the ultrasonic sensor the display will light up with the distance shown on a green background. The following images provide examples of the display and the changing colours as you get closer.
Note that the uneven colour and the sometimes uneven text in the photographs is a result of artifacts produced by the digital camera and its sensor - in real life the colour and text are pin sharp.
 |
 |
 |
The Parking Assistant makes extensive use of the touch screen feature of the Micromite LCD Backpack to allow the user to customise its operation. When the LCD panel is touched a menu will be displayed as shown below.
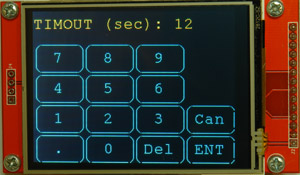
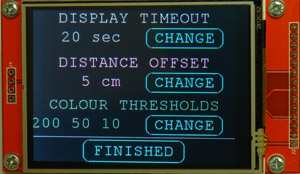 The Display Timeout parameter is the length of time that the display will remain on after the vehicle has stopped moving. Touching the CHANGE button will bring up an on-screen numeric keypad where the value can be changed.
The Distance Offset is the distance from the ultrasonic sensor at which point the display will show zero centimetres. This is useful if you want the car to stop before it reaches the sensor, perhaps to avoid hitting some other object like a work bench.
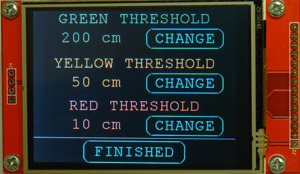
The Colour Thresholds are the distance thresholds where the background colour will change. When the CHANGE button is touched a further menu will be displayed which allowes each threshold to be changed (see below left).
The final photo (below right) provides an example of the numeric keypad which is used to enter these numbers.
 |
 |
As a reminder; all this is written in the BASIC language which is easy to understand and modify. It runs on a standard Micromite without any special features so you can download the program to experiment with and then use portions of it for your own purposes.
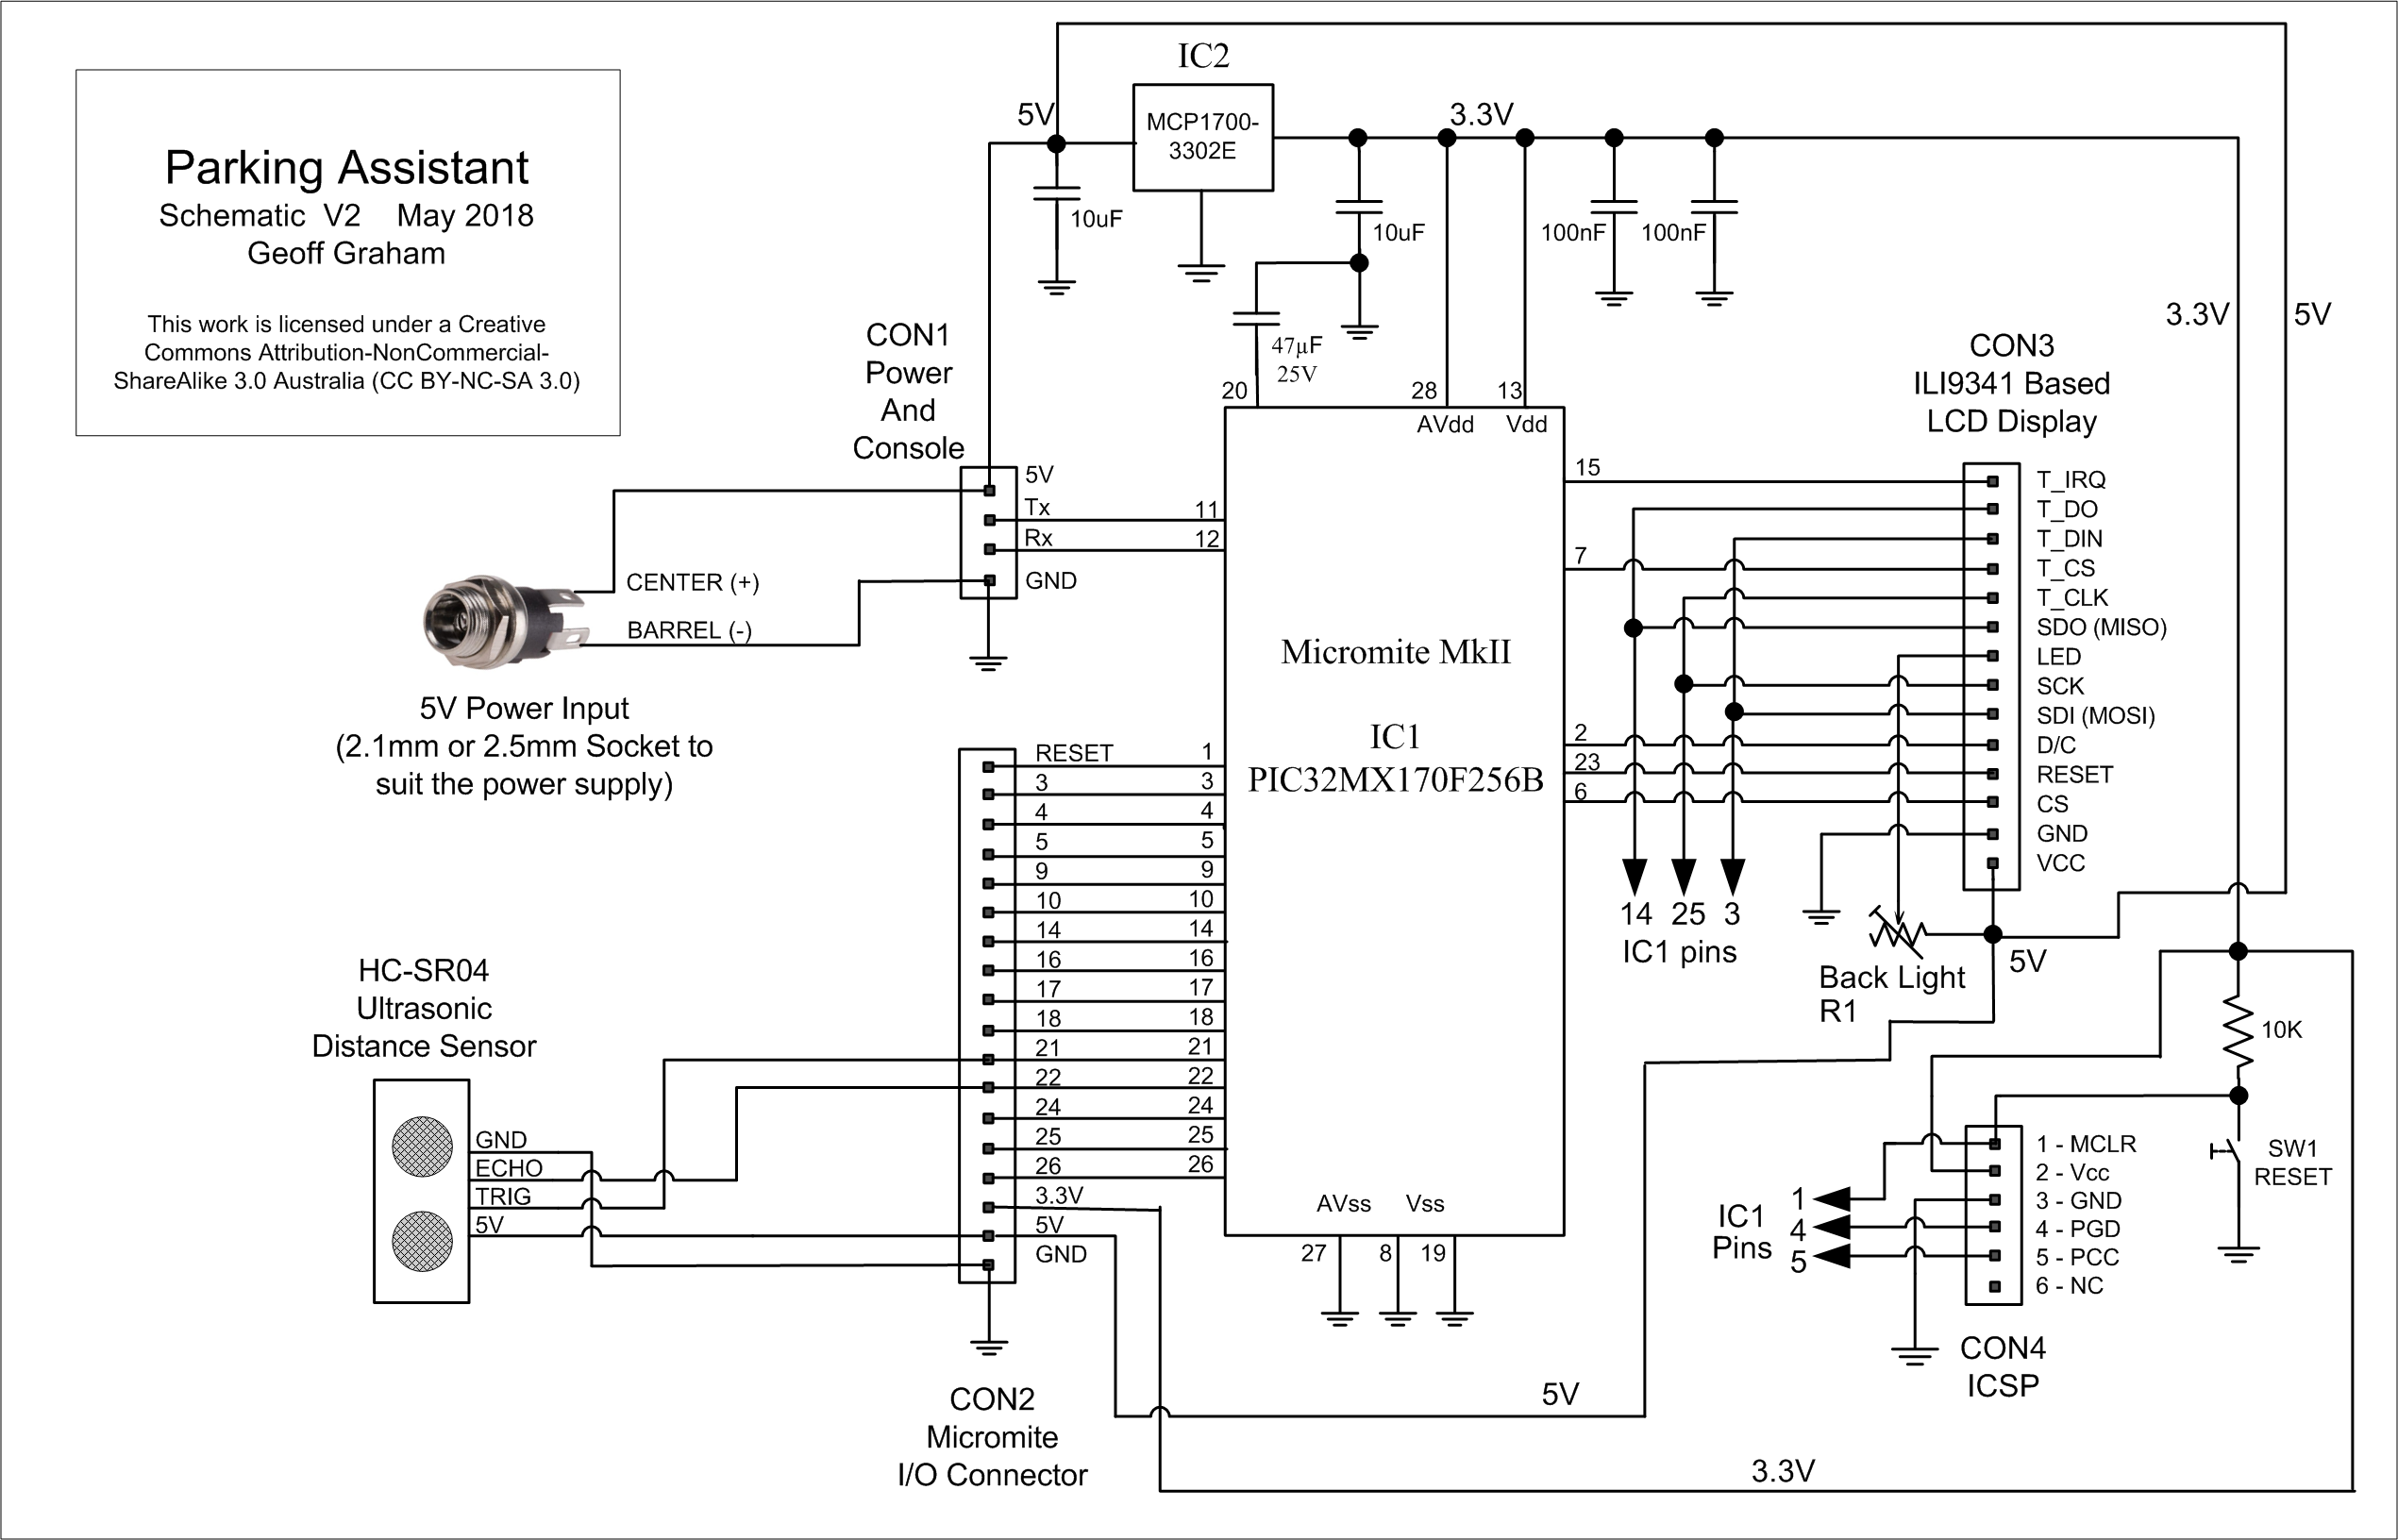
Circuit Diagram
In essence the Parking Assistant is just the Micromite LCD Backpack with an ultrasonic distance sensor. If you are unfamiliar with the Micromite LCD Backpack now would be a good time to explore its features on this web page and the standard 28-pin Micromite itself on this web page.
Below is the circuit diagram of the full Parking Assistant including the Micromite LCD Backpack.
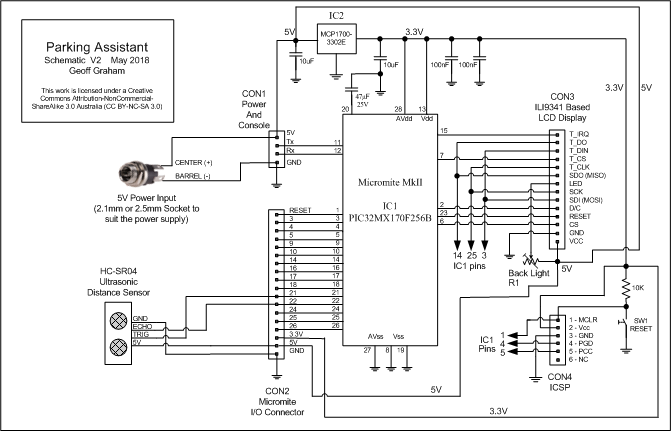
A fuller description of the backpack portion can be found on its web page. This page also includes the Micromite firmware, printed circuit board layouts and construction information. Note that the above diagram shows version 1 of the Micromite Backpack but you can also use version 2 with the power socket and ultrasonic transducers connecting to the same points.
The power supply must come from a regulated 5V power supply with at least 500mA capacity. Be careful that the output of the power supply does not exceed 5.5V. Many old power packs rated at 5V are unregulated and can have an unloaded output of 8V or more and that will damage IC2 and the ultrasonic sensor. Also, you should not use a USB charger to power this project as these have a noisy output which can disturb the ultrasonic sensor resulting in random distance readings.
The ultrasonic distance sensor should be connected via a four core cable as shown in the schematic. The sensor has a few different part numbers - the most common is HC-SR04 and it can be found on eBay for US$3, often including free postage. Compatible sensors are the SRF05, SRF06, Parallax PING and the DYP-ME007 (which is waterproof). All work the same as the HC-SR04.
Construction
The first step is to build and test the Micromite LCD Backpack as described on its web page. You can use the 2.4 inch version if you wish but the 2.8 inch version provides a more legible display from the driver's viewpoint. With that working you can attach an ultrasonic distance sensor and load the BASIC program which is available from the download area at the bottom of this web page.
There are three steps in the process of loading the firmware:
- Load the Micromite firmware using a PIC32 programmer (see this page).
- Configure the Micromite for the LCD display (see the Micromite LCD Backpack Construction Pack).
- Load the BASIC program ParkingAssist.bas (see the download area below).
You can reduce this to one step by simply programming a blank PIC32 with the file ParkingAssistFull.hex (available at the bottom of this page). This combines all three steps into the one file which includes the Micromite firmware, the settings for the display panel and the Parking Assistant BASIC program.
If you do not have a PIC32 programmer you can purchase a 28-pin PIC32 microcontroller from Silicon Chip magazine pre programmed with the full firmware (ie, ParkingAssistFull.hex) by following this link. This makes it very easy, all that you need do is just plug the chip into the socket on the PCB.
Silicon Chip also offer a full kit of parts for the Parking Assistant including the Micromite LCD Backpack, their front panel, the PCB, etc. Follow the above link if you are interested.
Boxing It
When it comes to housing the Parking Assistant you need two boxes, one for the display which should be mounted at eye level and the second for the ultrasonic sensor which should be mounted at bumper bar height (or fender height for US readers). You can design your own housings or follow what I did, which is described below. Silicon Chip magazine designed their own box solution which involved a laser cut transparent lid that looks quite cool and shows the internal workings (this lid can be purchased from their web site).
I used an UB3 ABS “Jiffy” Box for the display and a smaller UB5 box for the ultrasonic sensor. Both boxes are available in versions with mounting flanges which are convenient when attaching them to a garage wall. 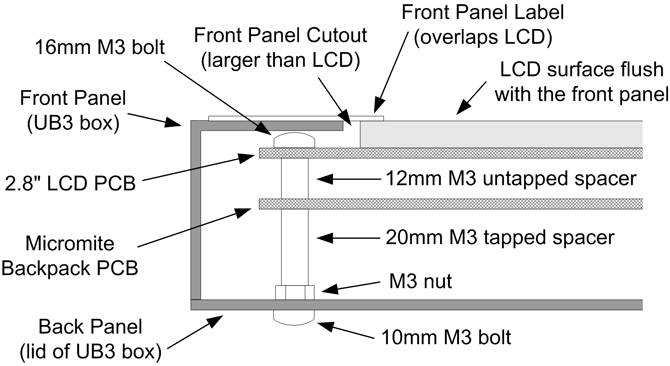
The base of the Micromite Backpack is mounted on the lid of the UB3 enclosure with the LCD display poking through the base of the box reversing the way that the box is normally used. The image on the right shows how the assembly looks.
This arrangement places the face of the LCD panel flush with the surface of the other face of the box when they are assembled. This is useful because it is difficult to cut a perfectly square and neat hole for the LCD display panel in the plastic box. Instead what you do is make a much larger hole and mount the display so that it pokes through the hole and is flush with the box’s surface.
To cover the ragged edges of the hole I attached an adhesive front label which was precision cut out to just show the active portion of the LCD. I made this label by printing the design onto a heavy duty adhesive label (Avery code 936067) and then covering the surface of the label with transparent adhesive plastic of the type used to cover books. When attached to the box the label's adhesive will also stick to the surface of the LCD making it difficult to separate it later, so to prevent this use talcum powder to defeat the exposed adhesive.
The enclosure for the ultrasonic sensor is a much easier proposition. This just requires two 16mm diameter holes which make a tight friction fit on the transducers and will hold the sensor in position. A four core telephone cable was then used to connect the sensor to the display box.
| Full sized schematic | DOWNLOAD |
| Parking Assistant BASIC program (ParkingAssist.bas) | DOWNLOAD |
| ParkingAssistFull.hex. This is a combined firmware file that contains the Micromite firmware configured for the LCD panel and the BASIC Parking Assistant program. | DOWNLOAD |