
Pico Gamer
![]()
![]()
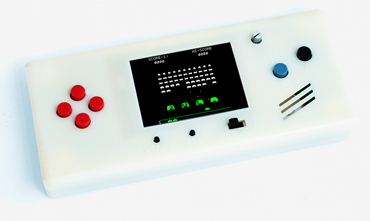
![]() The Pico Gamer is a handheld game console reminiscent of the Game Boy Advance which was popular in the early 2000s.
The Pico Gamer is a handheld game console reminiscent of the Game Boy Advance which was popular in the early 2000s.
It comes with 10 games including versions of Pac Man, Space Invaders, Tetris and Flappy Bird. All games are written in BASIC so it is easy to write your own games and add them to the device.
The Pico Gamer is based on the Raspberry Pi Pico and can be built in an hour or two with just a handful of components. The custom case is inexpensive and can be made by many companies.
The design, the games and the firmware are all completely free for you to download and use.
With its colourful 3.2" LCD and built in Lithium Ion battery the Pico Gamer can keep you entertained for up to 8 hours on a single charge.
This project was described in the April 2024 issue of Silicon Chip magazine. This web page provides a shorter description so, if you are building this project or would like the full story, you are encouraged to read the magazine article.
Back issues of the magazine can be purchased from Silicon Chip or electronic access can be purchased for about the cost of the printed issue - so it is good value.
Introductory Video
This video will give you an overview of the Pico Gamer (duration is 4 minutes).
The Games
You can easily write your own games for the the Pico Gamer but it comes with 10 games to get you started.
The highlights are:
 |
 |
 |
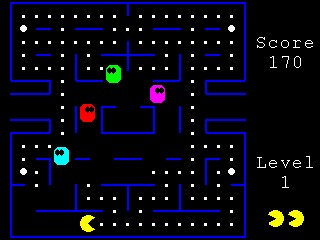
| Pico Man (a version of PacMan) |
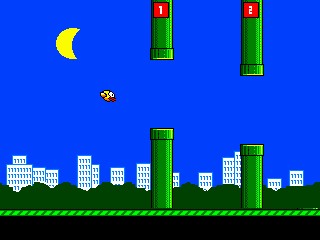
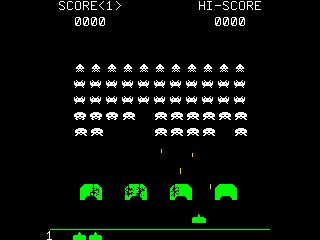
Flappy Bird | Pico Vaders (a version of Space Invaders) |
 |
 |
 |
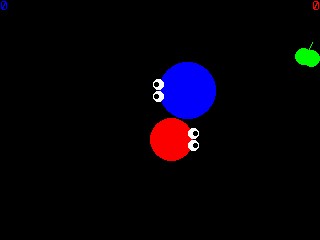
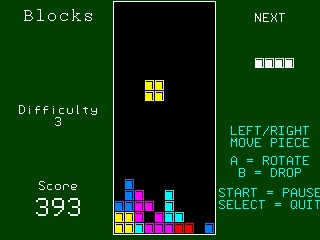
| Circle One | Pico Blocks (a version of Tetris) |
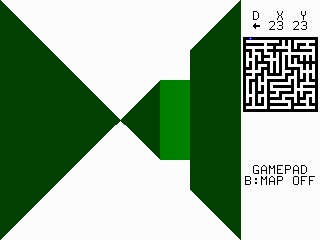
3D Maze |
 |
 |
 |
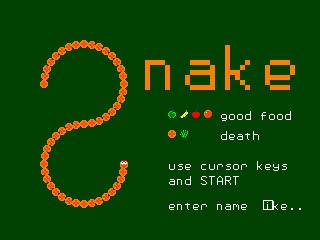
| Snake | PETSCII Robots | Lazer Cycle |
Silicon Chip magazine has a video demonstrating the games here: https://www.siliconchip.com.au/Videos/
Using the Pico Gamer
The console has eight buttons. The left four are used for direction control in games and the main menu. Under the screen are two control buttons - SELECT is used to run a game from the menu or exit a game, START is generally used to start or pause a game. On the right are two general buttons (A and B) which are used to fire guns, jump, or some other function defined by the game.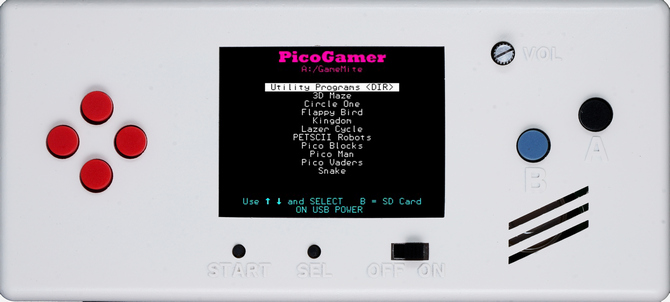
When turned on the Pico Gamer will display the main menu as shown on the right. The up/down buttons are used to select a game and the SELECT button will run it. Sub directories are also displayed in the main menu and if these are selected the menu system will display the contents of that with the option to run programs in that directory.
The Pico Gamer has a built in audio amplifier and speaker which is used by games to play music and sound effects such as beeps, squeaks and explosions. The output power is not huge but it is plenty loud for a hand held console and the small volume knob can be used to control this.
On the rear is a USB C socket which is used to charge the battery and connect to a PC. When connected to a PC you can update the firmware, write/debug games and copy files to and from the Pico Gamer. Also on the rear is a full size SD card slot. SD cards up to 32GB formatted in FAT16 or FAT32 are supported. If an SD card is inserted it can be selected using the B button and in that case the programs and sub directories on the SD card will be displayed.
 Games, images, music files, etc are normally stored in an internal filesystem called drive A: (the SD card is drive B:). This internal filesystem has about 2.6 MB of space which is sufficient for 30+ games. The use of this internal filesystem means that external storage (such as a SD card) is not a requirement and the Pico Gamer is completely self contained.
The Lithium Ion battery has a capacity of about 1000 mA hours which is good for about 8 hours of continuous play. Recharging the battery from flat takes about 4 hours. The Pico Gamer can also be powered from a USB charger if its battery is flat and the battery will charge during this time.
Acknowledgements
The idea of a Game Boy look alike using the Raspberry Pi Pico was developed by Tom Williams in the UK and he designed the Game*Mite with Mick Gulovsen (Australia) and published it on the Back Shed forum.
The Pico Gamer is based on Tom's idea but is a significant upgrade with its custom case and improved capacity and firmware. However, it is still software compatible with the Game*Mite so games and programs written for one will run on the other. The games themselves have come from a number of authors including Martin Herhaus (Germany), Harm (Netherlands), Tom Williams (UK) and the author (Australia).
Peter Mather developed the PicoMite firmware which runs on the RP2040-Plus and ported the MMBasic interpreter which was written by Geoff Graham (the author).
Design
The core of the device is the Waveshare RP2040-Plus processor board. This is a low cost pin for pin compatible clone of the Raspberry Pi Pico with three important upgrades:
- It includes a Lithium Ion battery charger.
- It has a fast flash memory chip so that we can overclock the RP2040 processor to 252MHz without fear.
- It has a minimum of 4MB of flash vs just 2MB on the standard Pico. This means that we can store 30+ games in the internal memory (the standard Pico struggles to store 8 games).
The RP2049-Plus comes in two versions with 4MB or 16MB of flash memory. You really only need the 4MB version as that will store more games than you will ever need. However, the 16MB version is only a dollar more and there is nothing wrong with selecting that. At the bottom of this page the firmware download contains two versions of the firmware configured for 4MB or 16MB flash so you can use either.
Note that the RP2049-Plus should be ordered without header pins installed as it needs to be soldered flush on the PCB.
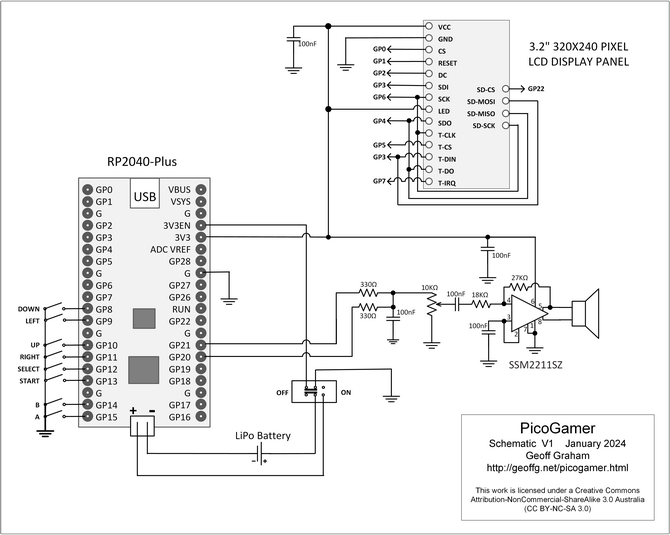 The circuit is quite simple with the RP2040-Plus at the centre. The button switches directly connect to it (internal pullups are used) and it drives the LCD, SD card and touch controller via an SPI bus. The audio is generated as a stereo PWM (pulse width modulated) signal which is summed and filtered by the two 330Ω resistors and the 100nF capacitor before being fed to the audio amplifier via the volume potentiometer. With its 3.3V power supply the amplifier does not deliver a lot of power but it is more than enough for a handheld device.
The LCD and amplifier are powered by the 3.3V output from the RP2040-Plus which remains constant regardless of the battery voltage. Note that the battery is disconnected when the power switch is in the off position so this means that the device needs to be turned on and connected to power to charge the battery.
These components are assembled on both sides of a single PCB which drops neatly into the custom 3D printed case.
 |
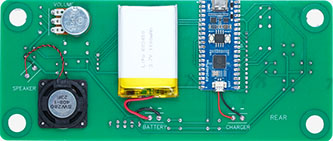 |
| The front of the PCB (facing the player) holds most of the components including the tactile button switches, the LCD and the audio amplifier. | The rear of the PCB holds just four components - the RP2040-Plus, the Lithium Ion battery, the loudspeaker and the volume control. |
The Construction Pack (which can be downloaded from the bottom of this page) contains everything that you need to build the Pico Gamer including hi-res photographs, the circuit diagram, parts list, PCB fabrication files, files to create the case, etc.
If you do not want to source your own components you can purchase a kit (including the case) from Silicon Chip magazine (link). This costs a little more but it is worth it as everything is supplied and all that you need to do is solder in the components. Note that due to postal restrictions this kit does not include the battery but this can be easily purchased from Altronics (Cat S4724) or from eBay.
 3D Printed Case
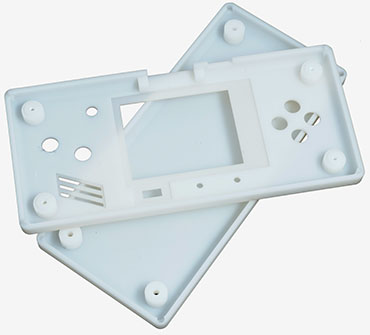
An important component is the custom 3D printed case. As well as having the correct dimensions for a handheld device with a smoothly rounded shape it also keeps the buttons in place. Without this the buttons would have too much side to side "wobble" which would ruin the game playing experience.
You do not need a 3D printer. All that you need to do is send the design files to a 3D printing company. There are many around the world but generally the cheaper ones are in China.
I used JLC3DP and they made the case and shipped it within a couple of days. The total cost was just US$17.50 (+freight) which is amazingly good value.
Using this case turns the Pico Gamer into a professional looking device of which you can be justifiably proud.
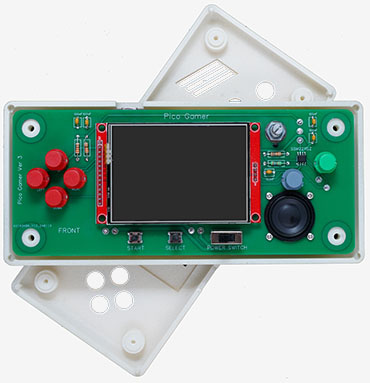 |
| The completed PCB fits neatly in the 3D printed case. |
For a description of how this case was designed check this web page.
The Firmware
The core of the firmware is the PicoMite software which includes a BASIC interpreter with support for LCD panels, sound output, etc. The PicoMite firmware runs on a Raspberry Pi Pico and, because it includes a BASIC interpreter, all games are written in BASIC.
A big benefit of this is that the games are in plain text so you can look through them to see how they do things and even, if you wished, modify them. You can read more about the PicoMite by following this link (http://geoffg.net/picomite.html) and downloading the user manual.
Games are stored in the A:/GameMite directory which is in the internal filesystem of the Pico (called drive "A:"). Also in this directory are the support files (ie, images, music, etc) that some games need.
Installing a game that you have written (or downloaded from The Back Shed Forum) is easy. All that you need do is copy it into the A:/GameMite directory in the Pico's internal filesystem. Then, when you next display the main menu, your program will be included in the list. You can copy the game either by using the XMODEM file copy protocol or by copying it to an SD card then copying it from there into the internal filesystem.
Loading the Firmware
In the firmware download (below) there are two versions of the firmware that you can load. One configured for the 4MB version of the RP2040-Plus, the other for the 16MB version. Firmware files have an have an extension of .uf2.
To load the firmware you should turn the Pico Gamer off and plug it into a USB port on your desktop or laptop computer. Then, hold down the BOOT button on the RP2040-Plus board while sliding the power switch to ON. This will cause the RP2040-Plus to startup in bootload mode and pretend to be a USB disk drive. Most operating systems will open a new window on your computer displaying the contents of this drive (which you can ignore). Then, all that you need to do is copy the appropriate firmware file to this drive and your computer will program it into your Pico Gamer's memory.
In the future, you can update the firmware without opening the case by plugging the USB into a computer and, using a terminal emulator, interrupt the program with CTRL-C, then enter the command UPDATE FIRMWARE.
This firmware file contains everything that you need - the PicoMite firmware with the BASIC interpreter and the correct options set, the menu program stored in slot 1 and the games with their associated image and music files installed in the internal filesystem.
Following the copy the Pico Gamer will reboot into the menu system and you are ready to go.
There is nothing else that you need do. Just start playing.
Writing Games
You can write your own games for the Pico Gamer. The BASIC programming language is easy to learn and the version running in the Pico Gamer (called MMBasic) has excellent support for drawing graphics, playing music and generating sound effects. There are a group of talented people on The Back Shed Forum who are writing games for the GameMite and the Pico Gamer so if you do write a game you should post it there for others to enjoy.
To write a game you should start by downloading the PicoMite User Manual from the bottom of this page. This describes everything that you need to know about the PicoMite and even includes a tutorial on programming in BASIC.
To work with the Pico Gamer your game must do at least three things, detect button presses, return to the main menu and be installed in the correct subdirectory.
Detecting Button Presses
The eight buttons are connected to the I/O pins GP8 to GP15 (physical pins 11 to 20) and will pull the pin low when pressed. So, your program must configure these pins as digital inputs with internal pullup resistors.
For example:
For i = 11 To 20
On Error Skip ' necessary as some pins in the range are ground pins
SetPin i, Din, PullUp ' configure as an input with a pullup resistor
Next i
Next add a series of constants defining the pin numbers:
Const bDOWN = 11, bLEFT = 12, bUP = 14, bRIGHT = 15
Const bSELECT = 16, bSTART = 17, bB = 19, bA = 20
In your program it is then easy to determine if a button is pressed. For example:
If Pin(bUP) = 0 Then ... ‘ up button pressed
If Pin(bLEFT) = 0 Then ... ‘ left button pressed
‘ and so on
Exit to the Main Menu
To return control to the main menu use the following command: Flash Run 1 and MMBasic will immediately transfer control back to the menu program in slot 1.
Install in the Menu
To do this you copy your program to the directory called /GameMite in drive A:. When the main menu program runs it will scan drive A:, discover the new program and include it in the menu.
| Pico Gamer Firmware V1.0. | DOWNLOAD |
| Pico Gamer Construction Pack includes photos, schematic, PCB and 3D printed case design files, parts list and construction notes (you also need to download the above firmware) | DOWNLOAD |